
Hoop earrings have a real gypsy feel to them, and the choice of beads will take them in the direction you want to go. Whether you choose to use crystal beads for dazzle, or substitute funky beads for fun, the choice is yours!
Using hoop findings
Hoop findings can be bought from any beading store quite cheaply. They come in a few sizes, and can really make some fabulous earrings.
They have a loop at the top to connect to the earring hook, and a large metallic hoop at the bottom to take the beads.
This large hoop is usually "opened" with pliers by pulling the wire out of the metal hole. Once the earring is made, this wire is slid back in and squashed firmly into place. This prevents the earring from breaking apart and losing the beautiful beads.
Materials
For this hoop earrings project, you will need the following materials:
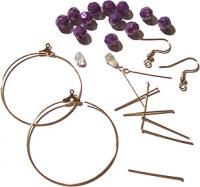
- Pliers (needle-nose works best)
- 2 Earring hooks
- 2 Jump-rings
- 2 Hoop findings
- 14 medium round crystal or plastic beads (purple)
- 2 Tear-drop shaped crystal beads (clear)
- 2 small round crystal beads (clear)
- 6 Head pins
- 2 Eye pins
Instructions
- Take a round crystal bead and slide it onto the hoop finding.
- Take a head pin, and thread on a small crystal bead, followed by a medium crystal bead.
- Using the cutting edge of the pliers, cut the head pin so that only a small amount sticks above the top crystal bead. About half an inch is a good length.
- With the pliers immediately above the bead, bend the head pin so that it makes a 90 degree angle to the post.
[image:112 class=img_right]
- Re-position the pliers at the end of the head pin, and roll back to create a loop. Close the loop.
- Open the hoop finding, and thread the loop of the head pin you made onto the hoop finding.
- Thread a round, crystal bead onto the hoop finding after the head pin.
- Take an eye pin, and slide on a round, crystal bead.
- Using the method in step 3-4, create a loop above the bead. The bead should now have a loop immediately above and below it, without much room to move.
- Take a head pin, and slide a tear-drop shaped crystal bead on.
- Create a loop above it using the method in steps 3-4, but do not close the loop.
- Hook the open loop of the head pin into the closed loop of the eye pin, and close the loop.
- Thread the other loop of the eye pin through the hoop finding.
- Thread another round, crystal bead after the eye pin.
- Take another head pin, and slide on a small crystal bead, followed by a round, crystal bead.
- Create a loop above these beads using the method in steps 3-4.
- Thread the loop of this head pin onto the hoop finding.
- Follow this by sliding another round crystal bead onto the hoop finding.
- Close the hoop finding, and use the pliers to squash the hoop together permanently.
- Repeat for the other earring.
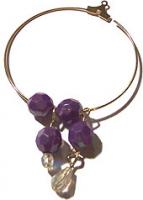
Conclusion
The eye pins and head pins used in this technique make the beads dangle well from the ear lobe.
You could add an extra eye pin to each drop if you would like to lengthen the earrings. For a special occasion, make these hoop earrings extra special by using tear-drop shaped crystal beads on the bottom of every drop.
Although purple plastic crystal-look beads were used for this project, the method works well with Swarovski crystals for a more glamorous look. Their facets are brilliant and they sparkle like diamonds in the hoop earring formation.
login to post comments
