You can alter any type of pattern to make clip-on earrings, even when conventional pierced earring findings are used. Clip-on earring findings hold the earring tight to the ear, either by using a snap or screw-in metal bar.
Screw-in findings often are more secure, and when you make clip-on earrings using beads that are expensive, you would use this type.
Clip-on earrings aren't just for people who do not have pierced ears. Over time, pierced earrings drag the lobe and stretch the holes they're in. Clip-on earrings will not cause such damage to your ears, and this is why some people still wear them who also have pierced ears.
Weight of clip-on earrings
If you are worried about how secure the clip-on earrings will be on your ears, use beads made of lighter materials to decrease the downward force on your lobes.
Plastic beads are much lighter than glass beads, so perhaps consider them in your design.
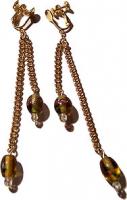
These instructions use glass beads, but make up for this weight by using light metal chain to secure them. This creates the illusion of large chandelier-style earrings, but without the weight.
Materials
To make clip-on earrings, you will need the following materials:
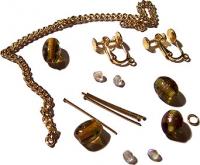
- Pliers
- 12 inches of gold chain
- 2 medium glass beads (brown/gold)
- 2 medium glass beads (brown)
- 4 small crystal beads (clear)
- 4 head-pins
- 2 jump-rings
- 2 clip-on earring findings
Instructions
- Cut the gold chain into two equal pieces using the cutting edge of the pliers.
- Take a jump-ring and open it up.
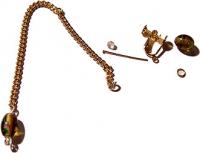
- Hook the open jump-ring through the loop on a clip-on earring finding.
- Keep the jump-ring open, and hook it through a link that is about in the middle of one of the pieces of gold chain.
- Close the jump-ring. The clip-on earring finding should now have two "drops" of gold chain connected to it by a jump-ring.
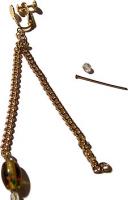
- Take a head-pin, and place a small crystal bead on it, followed by the brown/gold glass bead.
- Using the cutting edge of the pliers, allow for about half an inch after the glass bead and remove the rest of the post.
- Clamp the pliers down above the glass bead, and bend the post to make a ninety degree angle.
- Re-position the pliers at the end of the head-pin post, and roll back to create a loop.
- Before you close the loop, hook it through the last link on one of the gold chain drops, and then close it.
- Decide whether you want the drops to be the same length, or different lengths, and then cut the other gold chain drop to suit the style you have chosen.
- Take another head-pin, and place a small crystal bead on it, followed by a brown glass bead.
- Follow the directions in steps 7-10 to create a loop, then hook it through the other gold chain drop and close it.
- One earring is now made. Repeat for the other earring to make a pair of clip-on earrings.
Conclusion
These earrings can look as stylish or funky as you like, it is all about bead selection.
Just remember to keep the weight issue in mind. Test your clip-on earring out around the house before you wear them out, if you have any doubts about their staying power!
login to post comments
