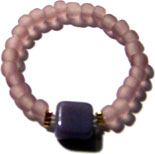
Rings do not feature that prominently in beaded jewelry. This is because the face of the ring is quite small, and this limits the size and amount of beads that you are able to include. It can be an interesting touch to make a ring to match a necklace or earrings, so you should try out a few methods.
The beads used to make a ring need to be quite small or flat. It will be uncomfortable to wear the ring if the beads stick out, and this will also cause it to catch on objects and break the ring.
These instructions show you how to make a ring using stretchy beading thread that is held in place with crimps. Be careful when you squash the crimps, as they can sometimes cut through the cord.
Deciding what size to make a ring
When sizing the ring, it should not be too small. If you must stretch the ring too much to put it on, you will put the joins under great stress and it might break.
Aim for a fit that is comfortable, but not too tight. If you follow the instructions, this ring would fit a medium sized finger. Tailor it to suit your fingers by adding or removing seed beads.
Nylon bead cord
Nylon bead cord is used in this project to make a ring. It is a very stretchy, elastic type plastic beading cord that is very versatile. You can use it to make any type of earrings, necklace, bracelets or rings, and is very durable.
Wetting nylon bead cord does not weaken it. This makes it quite a practical material to make a ring with, as the hands come in contact with water throughout the day whenever you wash your hands.
Using a nylon beading cord that can withstand these every day conditions is an advantage.
Materials
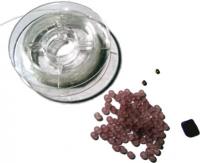
You will need the following materials to make a ring:
- Pliers
- 25 size 11 seed beads (light purple)
- 1 small, flat feature bead (dark purple)
- 2 crimps
- Nylon bead cord (You'll need less than two inches for the ring, but have a roll of it so you have some length to play with)
Instructions
- Slide the first crimp onto the nylon bead cord, and do not squash.
- Thread every purple seed bead onto the nylon bead cord.
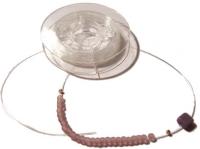
- Slide on the second crimp onto the nylon bead cord
- Thread the feature bead onto the nylon bead cord.
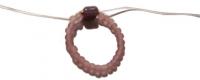
- Take the end of the nylon bead cord (on the feature bead side) and thread it through the first crimp on the other end. This crimp should now have two lots of nylon bead cord going through it, causing the line of seed beads to create a ring.
- Pull both ends of the nylon bead cord to make the ring tight.
- Once the ring is formed, squash both crimps to hold the nylon bead cord in place.
- Cut off the excess nylon bead cord as close to the crimp as you can.
Conclusion
This method is an extremely fast way to make a ring to match your jewelry. It is a great way to use up any seed beads or feature beads from the project, adding an extra something special the next time you wear all your jewelry together.
By perhaps making two or three rings, you can also layer them on the one finger to create a different look.
login to post comments
