Long, beaded chain necklaces are a key part of the gypsy boho look. To get the right vibe, use medium sized beads and lots of them! Sue beads that are too large, and you will look like you belong in the wrong decade.
Of course, if the eighties look is what you are going for, then be sure to make them as big and as tacky as possible for the full retro effect!
The amount of eye pins you will need will vary for the project. Ideally, the necklace should sit just below your sternum. If you are making this necklace to wear with a special top or dress, then put it on while you work and try on the necklace.
You want it to be long enough to sit on top of the fabric, too short and it will fall down the front of your top. Not a good look! The bottom of the necklace should sit about two inches below the seam of the top.
Choosing the beads
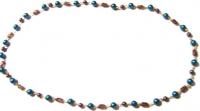
These instructions are for a beaded chain necklace made up of interesting bronzed purple glass beads, mixed with dark purple and turquoise plastic pearl beads. The bronzed purple glass beads are extremely glittery and contrast well with the cheaper plastic purple beads.
These bronzed purple glass beads are much more expensive than the two types of plastic pearls used as filler beads in this method, so are used much less frequently.
This makes the necklace very economical, makes the feature beads used stand out, making the necklace very eye-catching.
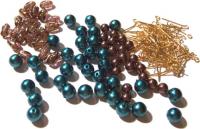
Materials
You will need the following materials to make a beaded chain necklace (use as many bead groups as you need for length, add groups or reduce the amount of groups):
- Pliers
- 52 eye-pins (one for each bead you use)
- 13 medium shiny glass beads (bronzed purple)
- 13 medium plastic pearl beads (dark purple)
- 26 medium plastic pearl beads (turquoise)
Instructions

- Take one bronzed purple glass bead and slide it onto an eye-pin.
- Using the cutting edge of the pliers, cut the eye-pin so that only a small amount sticks above the bead. About the width of your thumb is a good length.
- Clamp the pliers immediately above the bead and bend the head pin so that it makes a 90 degree angle to the post.

- Re-position the pliers to the end of the head pin, and roll back to create a loop.
- Before you close the loop, hook it through the loop of another eye-pin.
- Take a turquoise plastic pearl bead and slide it onto the eye-pin that is attached to the other eye-pin with the bronzed purple glass bead.
- Make the loop using the technique in steps 2-5, hooking on the next eye pin.
- Repeat this pattern for all beads around the necklace, arranging them in the following way:
bronzed purple - turquoise - purple pearl - turquoise - bronzed purple - turquoise - purple pearl - turquoise - bronzed purple - turquoise - purple pearl etc.
- Each group contains "bronzed purple - turquoise - purple pearl - turquoise - bronzed purple" then repeats until the necklace is finished. To make it longer, add another group of four beads or remove a group to make it shorter.
Do not just take off or add a few beads, because the pattern will not be uniform unless you stick to groups.
To connect the final bead and finish the necklace, just connect to the loop of the last turquoise eye-pin to the original bronzed purple glass bead's eye-pin.
Conclusion
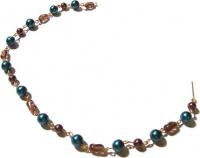
You should now have a continuous chain of beads that is the same repeating pattern. No catch or clasp is needed for this project, as the chain is large enough to pull over the head.
This is a great necklace for wearing out on the town. You will never need to worry about the "wrong" side of your necklace being on display when you party the night away!
login to post comments
